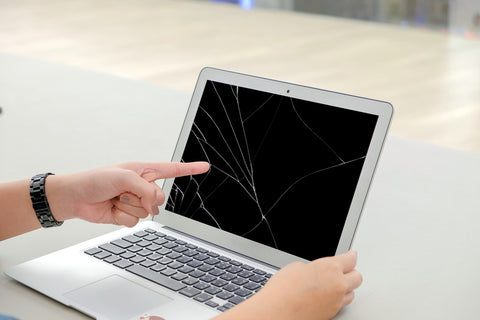
One of the best and least expensive protections you can get for your new MacBook, MacBook Air, or MacBook Pro is a screen protector. The screen is arguably the most important part of your MacBook, and subsequently, one of the most expensive fixes should it break. At Kuzy we highly recommend that every MacBook owner protect their investment with a screen protector.
If you have a MacBook cover as well as a screen protector, you’ll want to keep in mind that one of the key differences between the two is that screen protectors require a more in-depth application process. Most covers and cases will snap right on, whereas MacBook and MacBook Pro screen protectors require a more detailed process. The process isn’t hard, and if you follow this guide to a T it will be relatively easy, but it does require some focus and patience.
The package will include everything you need to properly apply your MacBook or MacBook Pro screen protector. And while the process can seem daunting at first, this step by step guide will make it easy to successfully install your own MacBook or MacBook Pro screen protector. If you are more of a visual learner, we have a YouTube video that breaks down this process as well.
A tip before you begin the application process: you will need to follow this guide on a different computer than the MacBook you are applying the screen protector to – or even use your phone. This almost goes without saying, but as you apply the MacBook or MacBook Pro screen protector, the screen itself will need to be turned off. It would be pretty difficult to read this guide if your screen is off!
Make sure you follow each of the steps in this guide if you want a hassle-free time applying your MacBook or MacBook Pro screen protector – and make sure you read all the way through as there are some additional tips and tricks at the very end. Now, with all this out of the way, it’s time to break out your new screen protector and let’s get started!
Step 1: Thoroughly Clean Your Screen with the Provided Alcohol Wipe
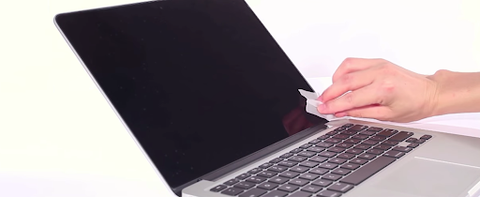
The first and most important step when applying your MacBook or MacBook Pro screen protector is making sure your screen is completely clean. To start, try to find a room in your home with as little dust as possible. Dust and small debris particles are the enemies of an easy screen protector application, so if you have pets, you should apply your screen protector in a room where they don’t spend much time – you might even want to try the bathroom. Once you have thoroughly wiped down your screen with the alcohol wipe, move on to step two.
Step 2: Use the Microfiber Cloth to Wipe the Screen Clean
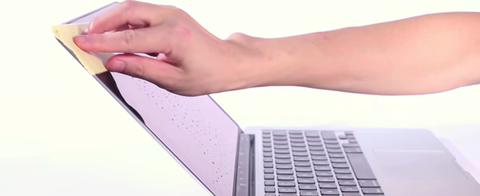
This step will help you remove additional dust particles and lint, and will also help to dry the screen after you’ve cleaned it with the alcohol wipe. When applying your MacBook or MacBook Pro screen protector you don’t want your screen to be wet. The microfiber cloth is a perfect tool to use on your screen as it won’t scratch or damage the screen in any way. You’ll want to use broad, circular strokes and make sure you wipe all the way to the edges of the screen to ensure full coverage.
Step 3: Use the Dust-Removing Tape to Get Rid of Any Remaining Dust Particles
This step of the process requires a little bit of focus. Make sure you’re in a well-lit environment and take a good hard look at your screen to find any last dust particles. (Don’t worry, if you don’t catch some, you’ll have another opportunity further along in the process to remove any pesky dust particles that remain.) Press the provided dust-removing tape on any last dust particles that you find on your screen. The dust-removing tape is great because it will even pick up dust particles that you can’t see with your eye. This step can be very satisfying, kind of like using a lint roller on your clothes after playing with a puppy.
Step 4: Attach the Alignment Tabs to the Screen Protector
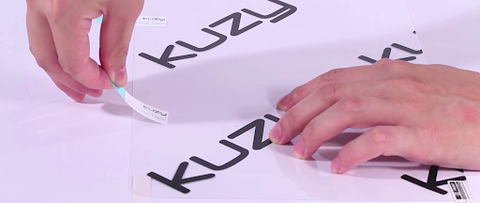
When it comes to applying your MacBook or MacBook Pro screen protector, this step is pretty straightforward. Find the alignment tabs, included in your screen protector package, and attach them to the screen protector itself. Then, place the screen protector on your screen.
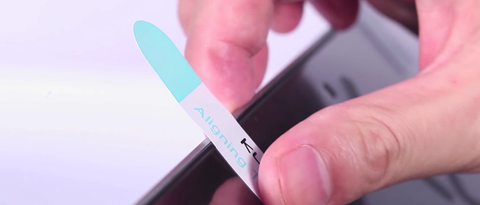
Step 5: Align the Screen Protector with your Device and Attach the Alignment Stickers
Now, paying close attention to the edges and corners, align your screen protector on your screen. One of the great things about Kuzy screen protectors is that they are not one size fits all. Every screen protector is specifically designed for each different MacBook model. For instance, the MacBook Air screen protector is unique from the MacBook Pro 13 inch screen protector – and that’s how it should be. Avoid screen protectors that try to market a one size fits all solution.
Once your screen protector is perfectly aligned with your screen, attach the alignment stickers by folding them around the edge of the screen. This will keep the screen protector in place throughout the remainder of the application process.
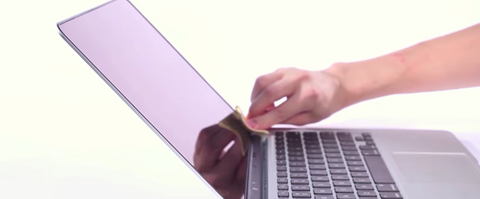
Step 6: Peel Off Layer #1 from the Screen Protector and Apply
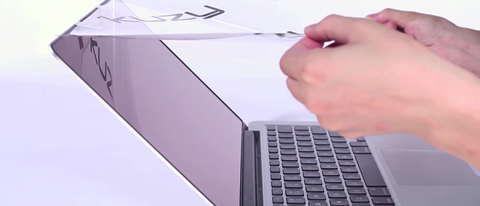
This one’s big! Lift up from the bottom of your MacBook or MacBook Pro screen protector. Then, going slowly and with precision, peel off Layer #1 from the back of the screen protector. Then, apply it to the screen, letting gravity adhere the screen protector from the top down to the bottom. It should have remained perfectly aligned thanks to the alignment stickers.
If after you’ve applied the screen protector you still see some dust particles underneath, don’t fret. Just move on to Step 7.
Step 7: Remove Dust Trapped in Bubbles with the Dust Tape
Even though you thoroughly cleaned your screen at the beginning of this process, there still might be some dust particles trapped between the screen protector and the screen. If this is the case, carefully lift back up the screen protector from the corners, and use the dust-removing tape to pick up any leftover dust particles. Then, carefully re-apply the screen protector.
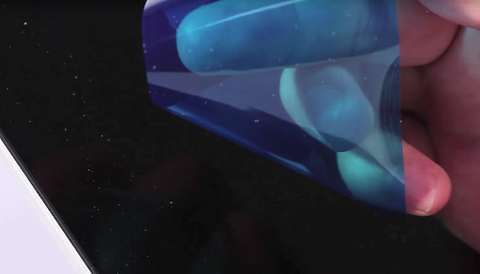
Step 8: Use the Hard Card to Remove Any Remaining Bubbles
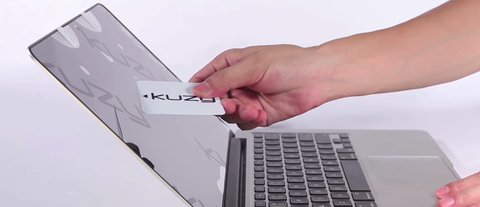
Even after removing all the dust particles from underneath your MacBook or MacBook Pro screen protector, you will most likely notice some bubbles near the edges of the screen. Never fear! The Hard Card is here! You can remove any bubbles by using the provided Hard Card to push them out from the center to the edge.
Step 9: Peel off Layer #2
Once you have gotten rid of any bubbles, peel back the alignment tabs from the top of the screen. Now it’s time to peel off Layer #2! This is the uppermost layer and should peel off easily. If you have any trouble removing it, make sure you’ve peeled back the alignment tabs first.
Step 10: Wipe Clean with Microfiber Cloth
You’re done! Finish up the application process by giving your MacBook or MacBook Pro screen protector a final wipe with the microfiber cloth. You should be left with a perfectly aligned, dust and bubble-free screen protector. Now you can go through life knowing the most vital part of your MacBook is fully protected!
Final Tips and Tricks
Good prep is key! Like the old adage says, “measure twice, cut once.” When it comes to the application process for your MacBook or MacBook Pro screen protector, keep in mind that having a completely clean screen to start will make the entire process easier. You’ll want to invest a lot of your time cleaning the screen and removing dust particles, instead of jumping ahead and applying the screen protector right away.
One thing to keep in mind with this step-by-step process, is that steps 7 and 8 can be repeated as many times as necessary to get rid of every last speck of dust and every bubble. In the long run, you don’t want any dust under your screen, so it’s good to remember that you can repeat steps 7 and 8 ad nauseum until you get the perfect result.
Pro-tip on finding a dust-free room: Using the steam from your shower can help create a dust-free environment in which to apply your MacBook or MacBook Pro screen protector. Let a hot shower run until steam fills the room (about 5 minutes), then close the door and let the steam dissipate. This will remove dust particles from the air, providing a dust-free environment right in your very own home.
If somehow you made it to the end of this guide and still don’t have a screen protector, what are you waiting for? Pick out the right screen protector and make sure the most vital component of your MacBook, MacBook Air, or MacBook Pro is protected! https://www.kuzyproducts.com/collections/screen-protectors


Kuzy Products
Author